
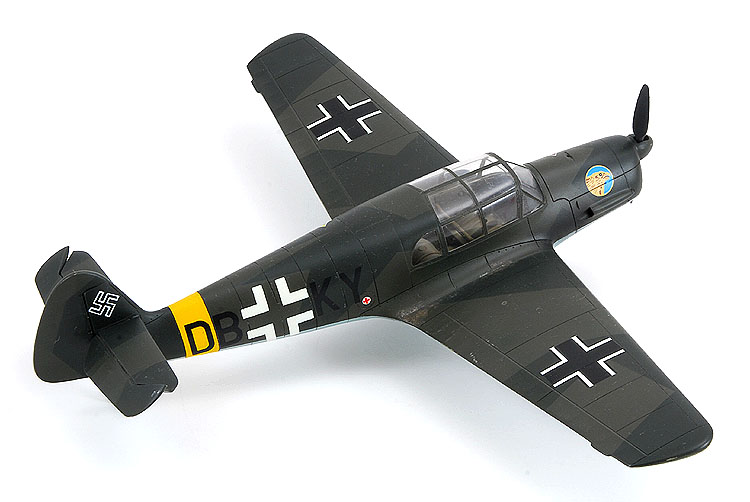
Despite its military markings, you can really see the Bf 108's heritage as a civilian touring airplane.
Kit:
Aftermarket:
Date:
Eduard
None
2002
In the pre-war era, Willy Messerschmitt was called upon to design a four seat touring aircraft for a prestigious European air rally. Although the top German team only managed a
fifth place finish, the Bf 108 was recognized as a well designed, well flying utility aircraft.
Examples of the Bf 108 Taifun were used for general personnel transport by not only the German military, but by numerous German embassies. An example being operated by the German
Embassy in England was confiscated in 1939. During the war, examples of the 108 were attached to many units, again for use in general transportation and liason duties. As a result,
the Taifun flew in a wide assortment of colour schemes, allowing it to blend in with most World War Two model collections.
In mid-2002 Eduard's Bf 108 hit the shelves here in Calgary, and I snapped one up. Thoroughly impressed with the quality of their earlier P-39 family, I looked forward to seeing
what Eduard had in store in this kit. Upon opening the box I knew this was another example of a well-engineered, tight fitting injection kit. In fact I'll go on record to say that
it rivals Hasegawa's Me 109 line for detail and quality. All parts are moulded in a khaki green plastic that I later realized was almost a perfect match for RLM 02. Engraved panel
lines are nice and crisp, however a circular fuel filler cap needs to be added to the upper fuselage, Eduard forgot to add this item, but they include a decal for the necessary
stenciling on what would otherwise be a non-existent detail.
Parts are included in the 108B kit to create a later 'D' model with a different rudder and a constant speed propeller, distinguishable by the fins on the propeller hub. Apparently
these are the only external changes between the 'B' and 'D' models.
I began assembling the kit with the three-piece wing. Like the P-39 kits, Eduard has chosen to leave locator pins out of this kit. I carefully lined up the panel lines on the
leading edge before applying some liquid cement. The fuselage halves were glued together using liquid glue and test fit to the wings. Other reviews on the Internet commented on gaps
in the wing to fuselage joint, mine however might be considered tight. In your example you may need to trim or fill as required to produce a seamless joint. With both halves
together, I set the assembly aside since I'd need to insert several other assemblies inside. The cockpit tub is completely assembled outside of the fuselage, and glued in at a later
time. I glued the floor, sidewalls and rear bulkhead in place before airbrushing a coat of RLM 02 over everything in the interior. This is where I discovered that the plastic is
almost the same colour, so close in fact that I didn't paint certain items in the interior - I dare you to point them out. The seats were cleaned and painted in British Dark Earth
before I washed them and the remainder of the cockpit details with an acrylic dark brown.
A nicely detailed, inverted V-8 engine is included, and builds up nicely following the kit instructions. Although the cowling is moulded shut, lots of this engine can be seen
through the air intake on the front, and the exhaust cutout in the lower cowling. I assembled the engine following the instructions and mounted it to the firewall before I slid it
into the fuselage through the cockpit cutout.
Now with everything else assembled, I began test fitting the cockpit into place. Again through other Internet reviews, I was forewarned to expect trouble clearing the landing gear
wells with the floorboard.
My boxing of the 108 included markings for four aircraft. One was a pre-war Embassy aircraft, a post-war Hungarian aircraft and two wartime Luftwaffe machines. I was somewhat
disappointed in that the last three examples all featured the same RLM 70/71 dark green camouflage pattern, with little variation. If you're like me and don't plan on buying
aftermarket decals, you're stuck.
Eduard includes a set of pre-stamped window masks, and I chose to experiment with these, as there are several curves that I felt would give me trouble. With the masks in place, and
the centers filled with Tamiya tape, I airbrushed a coat of RLM 02 over the window frames, blending them into the interior.
I started the main colours by spraying a section in the rear fuselage with yellow, which was allowed to dry before I masked an identification strip with bands of Tamiya tape. The
first of the camouflage colours, RLM 65 Light Blue was sprayed over the undersides of the model and allowed to dry overnight. I then proceeded to paint the German splinter pattern
with RLM 70 and 71 Dark Greens, To create the tight demarkation between sections I used some small "Post-it Notes."
I chose to finish my 108 in the markings of DB*KY, an aircraft flown by Pilot W. Zeugner, IV/JG51, a scheme very similar to the 4th Air Force Fighter Group (1942) and the Royal
Hungarian Air Force (1945), also included in the kit. The reason for this choice was somewhat simple. This aircraft had three pieces of artwork on the nose instead of one - I like
colour. Eduard's decals were in perfect register, and applied well to the smooth surface of Future. I used my traditional bottle of Gunze's Mr. Marksofter decal setting solution and
the markings sank into the panel lines without difficulty.
I used some black acrylic paint to highlight a couple of panel lines along my model's undersides. Then some chalk pastel was used to recreate some exhaust staining behind the
cowling before I sprayed the entire model with Polly Scale's clear satin finish. Remove the masks, and voila - a finished Taifun!

